A Comprehensive Guide to Building ML Pipelines with Vertex AI

Introduction to Vertex AI
In today’s data-driven world, businesses rely heavily on machine learning models to automate processes, enhance decision-making, and drive innovation. However, managing the entire lifecycle of an ML model — from data ingestion to deployment — can be challenging. This is where Google Cloud’s Vertex AI steps in.
Vertex AI is a managed machine learning (ML) platform that allows businesses to train, deploy, and scale ML models efficiently. It simplifies the ML workflow by offering unified tools for model training, deployment, feature engineering, and monitoring.
Building an End-to-End ML Pipeline with Vertex AI
This guide walks through the key steps in building an ML pipeline using Vertex AI’s Jupyter Notebook. We cover:
- Feature Store Creation
- Data Ingestion
- Model Training
- Pipeline Creation & Model Deployment
- Building an API Wrapper for Model Predictions (optional)
- Predicting using the API (optional)
1. Feature Store Creation
The first step in any ML pipeline is managing and storing features efficiently. A feature store allows us to centralize feature engineering, reuse features across models, and ensure consistency.
Implementation Steps:
- Read the Dataset
import pandas as pd
df = pd.read_csv("bmi.csv")
2. Initialize Vertex AI SDK
from google.cloud import aiplatform
project_id = 'bmi-project-demo'  # Replace with your Google Cloud project ID
location = 'asia-south1'         # Replace with your desired region
aiplatform.init(project=project_id, location=location)
3. Create the Feature Store with CMEK (Customer Managed Encryption Keys)
key_ring = your-keyring-name
key_name = your-key-name

featurestore_id = "health_metrics_featurestore"
encryption_key_name = f"projects/{project_id}/locations/{location}/keyRings/{key_ring}/cryptoKeys/{key_name}"

featurestore = aiplatform.Featurestore.create(
    featurestore_id=featurestore_id,
    online_store_fixed_node_count=1,
    encryption_spec_key_name=encryption_key_name,
    location=location
)
4. Confirm Feature Store Creation
featurestores = aiplatform.Featurestore.list(location=location)
for fs in featurestores:
    print(fs.resource_name)
5. Create the Entity Type
Entity is a unique instance or object for which you store and retrieve features. Think of it as the central unit around which your features are organized. It acts as an umbrella for all the related features.
entity_id = 'individual'  # Replace with desired entity name
entity_type = featurestore.create_entity_type(
    entity_type_id=entity_type_id,
    description='Features related to individual health metrics'
)
print("Entity type created:", entity_type.resource_name)
6. Create Features
Features are the individual measurable properties or characteristics of the data that serve as inputs to your model. All the related features will be stored and managed under one entity in the feature store.
# Feature names should be in lowercase
features = {
    'gender': 'STRING',
    'height': 'DOUBLE',
    'weight': 'DOUBLE',
    'bmi': 'DOUBLE'
}

for feature_id, value_type in features.items():
    entity_type.create_feature(
        feature_id=feature_id,
        value_type=value_type,
        description=f'{feature_id} of the individual'
    )

print("Features created successfully!")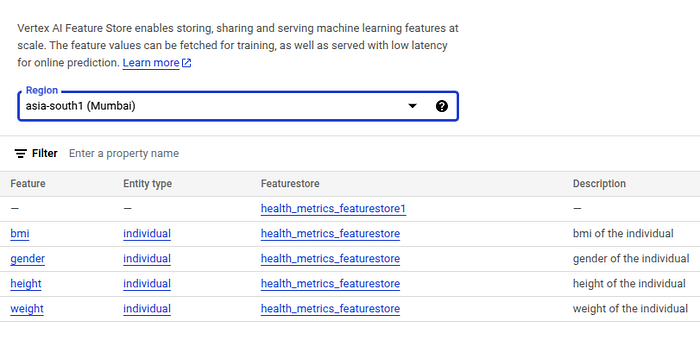
2. Data Ingestion
Once the feature store has been created with entities and features, the next step is to ingest data into it. There are multiple ways to ingest data, such as ingest_from_gcp, ingest_from_bigquery, ingest_from_cloud_storage, and ingest_from_file, but in this guide, we will focus on using ingest_from_df for directly loading data from a Pandas DataFrame.
Implementation Steps:
- Entity ID and Time Stamp Columns
In the current dataset, add 2 columns — entity_id and feature_timestamp. Adding entity_id and feature_timestamp is crucial for feature store ingestion. The entity_id uniquely identifies records and ensures efficient data retrieval. The feature_timestamp is essential for maintaining temporal consistency, enabling point-in-time correctness, and supporting time-based aggregations.
In online predictions, the model uses the most recent features available for an entity at prediction time. This ensures that real-time predictions are based on the latest data.
In batch predictions, historical feature values are fetched using the feature_timestamp to match the exact point in time when the event occurred (e.g., when a transaction happened). This prevents data leakage, ensuring the model only sees data available at that moment rather than future information.
from datetime import datetime

# Add entity_id column
df.insert(0, 'entity_id', range(1, len(df) + 1))

# Add feature_timestamp column
df.insert(1, 'feature_timestamp', datetime.utcnow())

print(df.head())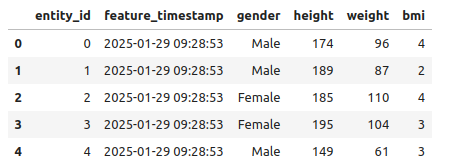
2. Ingest Data
entity_type.ingest_from_df(df_source = df,
                           feature_time='feature_timestamp',
                           feature_ids=['gender', 'height', 'weight', 'bmi'])
3. Model Training
Once data has been ingested into feature store, we will proceed to fetching the data and training the model.
Implementation Steps:
- Fetch data using Entity ID
Note: When fetching data using the entity ID, the feature_timestamp column is not included.
entity_ids = list(range(1, 500))

data = []

for entity_id in entity_ids:
    entity_id_str = str(entity_id)
    entity_data = entity_type.read([entity_id_str])
    if entity_data.empty:
        print(f"Warning: No data found for entity_id {entity_id_str}")
        continue

    feature_values = entity_data.iloc[0].to_dict()
    feature_values["entity_id"] = entity_id_str
    data.append(feature_values)

df = pd.DataFrame(data)
df.info()
2. Independent/Dependent Features
Exclude entity_id and bmi from the feature set since entity_id is an identifier and bmi is the target variable.
X=df.drop(columns=['entity_id', 'bmi'])
y=df['bmi']
3. Feature Transformation
Convert the gender feature, which currently contains categorical values (Male, Female), into numerical labels using label encoding.
from sklearn.preprocessing import LabelEncoder
le = LabelEncoder()
X['gender']=le.fit_transform(X['gender'])
4. Train-Test Split
from sklearn.model_selection import train_test_split
X_train,X_test,y_train,y_test = train_test_split(X,y,test_size=0.25,random_state=42)
5. Model Training
Training a LinearRegression model for demonstration purposes. You may choose an alternative model that better fits your data and requirements.
from sklearn.linear_model import LinearRegression
lr = LinearRegression()
lr.fit(X_train, y_train)
y_pred=lr.predict(X_test)
6. Accuracy Testing
from sklearn.metrics import mean_squared_error, r2_score
mse = mean_squared_error(y_test, y_pred)
r2 = r2_score(y_test, y_pred)
print(f"MSE: {mse}")
print(f"R2 Score: {r2}")
7. Model Serialization
import joblib
# # joblib.dump(lr, 'model.pkl')
joblib.dump(lr, 'model.joblib')
4. Pipeline Creation & Model Deployment
This section focuses on creating a pipeline to deploy our model and accessing it via the endpoint.
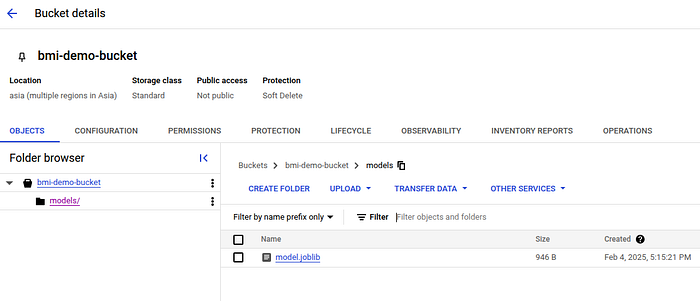
Prerequisite: Create a bucket (say bmi-demo-bucket) and a folder named models in the bucket. Upload your model.joblib file to it.
import logging

logging.basicConfig(level=logging.INFO)
logger = logging.getLogger(__name__)

try:
    logger.info("Starting model upload to Vertex AI")
    artifact_uri = "gs://bmi-demo-bucket/models"  # This should point to the directory containing model.joblib

    model = aiplatform.Model.upload(
        display_name="sklearn-regression",  # Specify model registry name
        artifact_uri=artifact_uri,
        serving_container_image_uri="asia-docker.pkg.dev/vertex-ai/prediction/sklearn-cpu.1-3:latest",  # Specify image uri specific to the version of sklearn you trained your model with
        serving_container_environment_variables={
            "SKLEARN_ALLOW_DEPRECATED_SKLEARN_PACKAGE": "True",
            "WORKERS_COUNT": "1",
            "SKLEARN_ALLOW_PICKLE": "TRUE"
        }
    )
    logger.info(f"Model uploaded successfully: {model.resource_name}")

    logger.info("Creating endpoint")
    endpoint = aiplatform.Endpoint.create(
        display_name="sklearn-regression-endpoint"  # Specify endpoint name
    )
    logger.info(f"Endpoint created: {endpoint.resource_name}")

    logger.info("Deploying model")
    model.deploy(
        endpoint=endpoint,
        deployed_model_display_name="sklearn-regression-v1",  # Specify model display name
        machine_type="e2-standard-4",
        min_replica_count=1,
        max_replica_count=1
    )
    logger.info("Model deployed successfully")

except Exception as e:
    logger.error(f"Error during deployment: {str(e)}", exc_info=True)
    raise
5. Prediction using Model Endpoint
def predict_custom_trained_model(
    project: str,
    endpoint_id: str,
    location: str,
    instances: list
):

    # Get the endpoint
    endpoint = aiplatform.Endpoint(
        endpoint_name=f"projects/{project}/locations/{location}/endpoints/{endpoint_id}"
    )

    try:
        prediction = endpoint.predict(instances=instances)
        return prediction.predictions

    except Exception as e:
        print(f"Error during prediction: {str(e)}")
        raise

# Make prediction
try:
    prediction = predict_custom_trained_model(
        project="your-project-id",
        endpoint_id="your-model-endpoint",
        location="asia-south1",
        instances=[[0, 172.0, 89.0]]  # [gender, height, weight] as a list
    )

    print("\nPredicted BMI:", prediction)

except Exception as e:
    print(f"Failed to get prediction: {str(e)}")
Voila! You have successfully built an ML pipeline on Vertex AI!
6. API Wrapper on Model Endpoint (Optional)
This section is optional. You can access your model via the endpoint, but if you want to access it outside your instance, you can create a API wrapper around it.
from fastapi import FastAPI, HTTPException
from pydantic import BaseModel
from typing import List, Optional
import uvicorn

app = FastAPI(title="BMI Prediction API")

# Define request model
class BMIPredictionRequest(BaseModel):
    gender: int
    height: float
    weight: float

# Define response model
class BMIPredictionResponse(BaseModel):
    bmi: float
    prediction_id: Optional[str] = None

# Initialize Vertex AI endpoint configuration
ENDPOINT_CONFIG = {
    "project": "your-project-id",
    "endpoint_id": "your-model-endpoint",
    "location": "asia-south1"
}

def get_prediction(instances: List[List]):
    """Helper function to get prediction from Vertex AI endpoint"""
    try:
        endpoint = aiplatform.Endpoint(
            endpoint_name=f"projects/{ENDPOINT_CONFIG['project']}/locations/{ENDPOINT_CONFIG['location']}/endpoints/{ENDPOINT_CONFIG['endpoint_id']}"
        )
        prediction = endpoint.predict(instances=instances)
        return prediction.predictions[0], prediction.deployed_model_id
    except Exception as e:
        raise HTTPException(status_code=500, detail=f"Prediction failed: {str(e)}")

@app.on_event("startup")
def startup():
    """Initialize Vertex AI on startup"""
    aiplatform.init(
        project=ENDPOINT_CONFIG["project"],
        location=ENDPOINT_CONFIG["location"]
    )

@app.post("/predict", response_model=BMIPredictionResponse)
async def predict_bmi(request: BMIPredictionRequest):
    """
    Predict BMI based on gender, height, and weight

    - gender: 0 for female, 1 for male
    - height: height in centimeters
    - weight: weight in kilograms
    """
    try:
        # Format instances for prediction
        instances = [[
            request.gender,
            request.height,
            request.weight
        ]]

        # Get prediction
        prediction, model_id = get_prediction(instances)

        return BMIPredictionResponse(
            bmi=float(prediction),
            prediction_id=model_id
        )

    except Exception as e:
        raise HTTPException(status_code=500, detail=str(e))

@app.get("/health")
async def health_check():
    """Health check endpoint"""
    return {"status": "healthy"}

if __name__ == "__main__":
    uvicorn.run(app, host="0.0.0.0", port=8082)
python app.py
In Terminal, run the following command to run the API:
python app.py7. Prediction using Wrapper API
import requests

url = "http://localhost:8082/predict"
data = {
    "gender": 0,
    "height": 172.0,
    "weight": 89.0
}

response = requests.post(url, json=data)
print(response.json())
Conclusion
Vertex AI simplifies the ML lifecycle by providing end-to-end solutions for feature engineering, model training, deployment, and serving. With its unified AI tools, businesses can reduce time-to-market for ML applications while ensuring scalability and reliability.